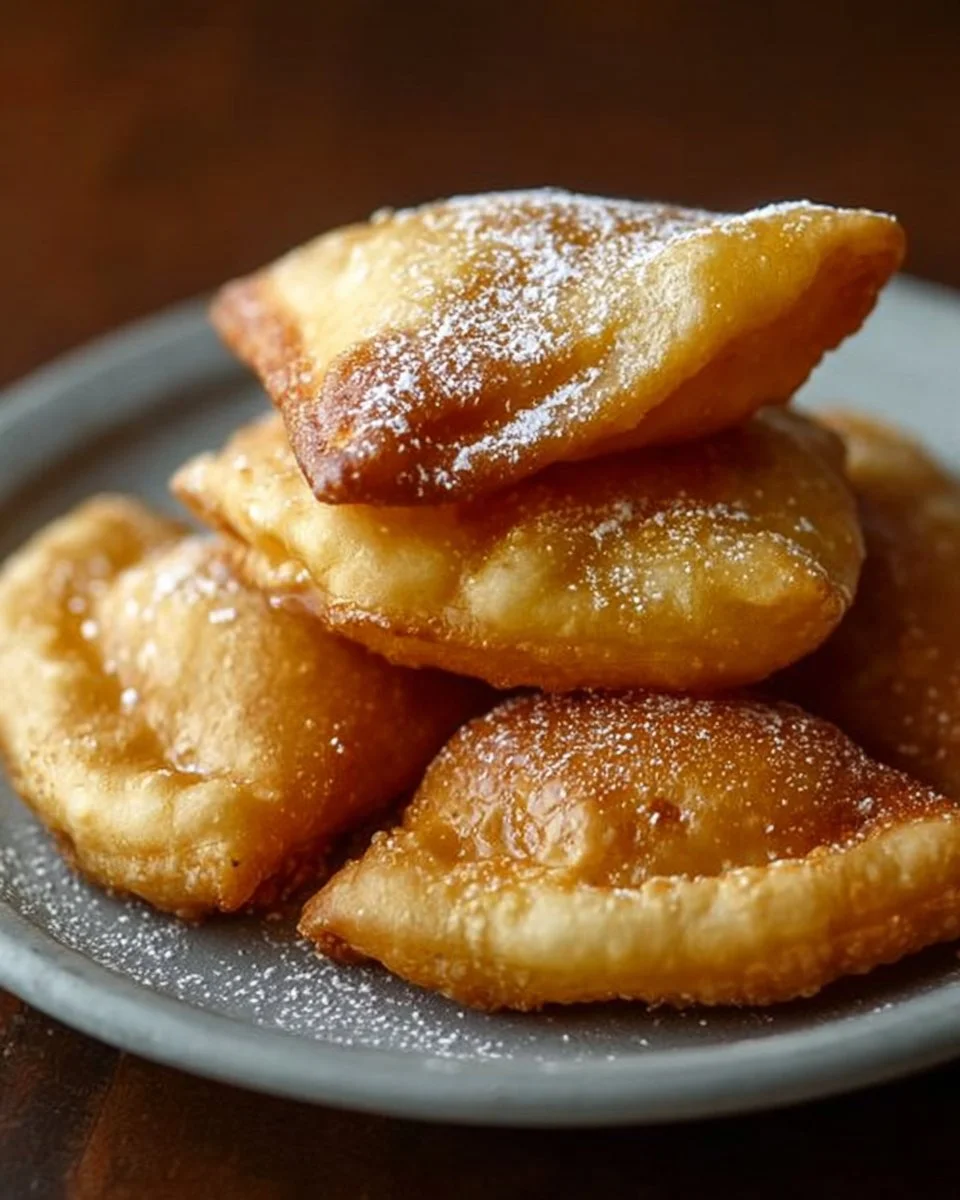
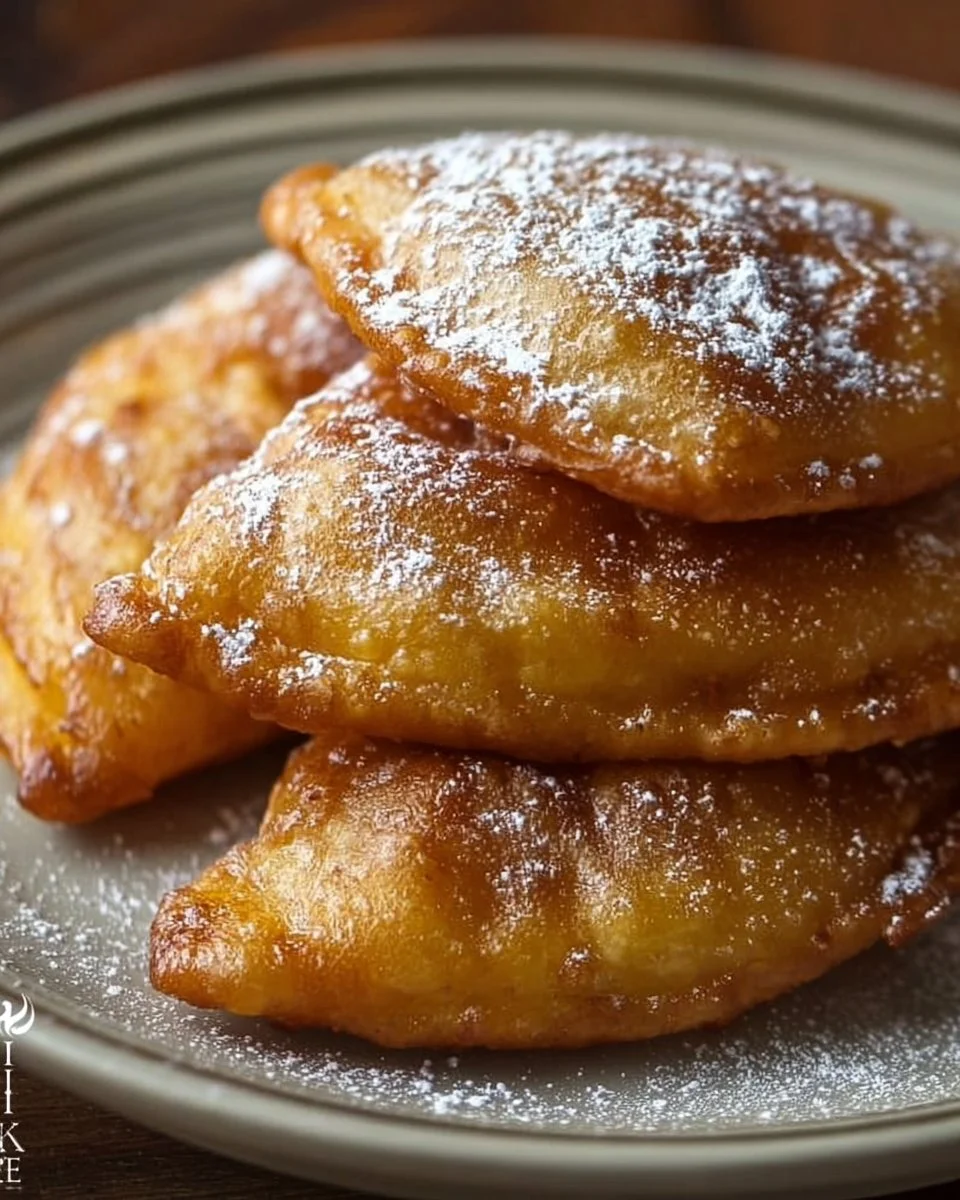
There’s something truly special about biting into a freshly made sopaipilla. Picture this: a warm, golden dough puffed up beautifully, crispy on the outside with a tender, billowy interior just waiting to be filled with sweetness or creaminess. To me, it’s a comfort food that dances on your palate, offering that perfect contrast of textures. I often whip these up for family gatherings, as they bring back a flood of memories from my childhood, filling the kitchen with laughter and warmth.
Not only do sopaipillas come together surprisingly fast, but they also serve a multitude of occasions — from a delightful dessert to a savory snack when paired with chili or stews. Plus, if you happen to have leftovers (which is rare in my house!), they can easily be reheated for a quick treat or surprise breakfast the next day.
WHY I LOVE SOPAIPILLAS
Sopaipillas are a true winner at my table! I adore how incredibly easy and undeniably delicious they are to make. The joy these little gems bring, with their lightness and the option to create both sweet and savory variations, hits that sweet spot every time. Whether serving them as a side to a meal or as a stand-alone dessert drizzled with honey, there’s always a reason to bring these delightful puffs into the spotlight.
SOPAIPILLAS INGREDIENTS
The magic of this sopaipilla recipe lies in the simplicity of its ingredients. Each component plays a vital role in creating that heavenly, golden puff we adore. Don’t worry about exact measurements just yet; those are all in the recipe card for you!
Essential Components
- 2 CUPS ALL-PURPOSE FLOUR: The backbone of your sopaipillas, providing structure and that glorious chewy texture.
- 1/2 TEASPOON BAKING POWDER: This little gem helps the dough rise beautifully, resulting in fluffy treats.
- 1/2 TEASPOON SALT: A pinch of salt balances the flavors perfectly.
- 2 TABLESPOONS VEGETABLE SHORTENING: This adds richness and a tender crumb.
- 3/4 CUP WARM WATER: Hydrates the dough and brings everything together for the right consistency.
- OIL FOR FRYING: Essential for that golden, crispy exterior. I recommend using a neutral oil that has a high smoke point.
- HONEY OR POWDERED SUGAR FOR SERVING: The ultimate finishing touch, whether you’re drizzling on some sweetness or dusting with powdered sugar!
SUBSTITUTIONS AND TIPS
Need a swap? Here are some options to think about:
- Butter instead of Shortening: If you’re in the mood for a richer flavor, swap the shortening for an equal amount of butter, though it won’t be quite as light.
- Whole Wheat Flour: For a healthier twist, use whole wheat flour, though expect a denser result.
- Coconut Oil: This will lend a delightful hint of coconut flavor, great for tropical vibes!
- Consider adding spices: A pinch of cinnamon or nutmeg can give them a warm, comforting flavor profile.
KITCHEN TOOLS YOU’LL NEED
- Mixing bowl (medium-sized)
- Rolling pin
- Knife or pizza cutter (for cutting shapes)
- Frying pan or deep pot
- Slotted spoon (for removing and draining the sopaipillas)
- Paper towels (for draining excess oil)
HOW TO MAKE SOPAIPILLAS
Let’s dive into creating this wonderfully fluffy sopaipilla! Follow along, and you’ll have a delicious treat in no time. We’re aiming for that perfect golden-brown color with a soft interior.
Mix Flour, Baking Powder, and Salt
First, in a mixing bowl, combine the 2 cups all-purpose flour, 1/2 teaspoon baking powder, and 1/2 teaspoon salt. Mixing these dry ingredients well ensures an even rise, which is key for delightful texture.
Incorporate Shortening for Tenderness
Next, add the 2 tablespoons vegetable shortening to the flour mixture. Use your fingers to mix until the mixture resembles fine crumbs. This step is crucial; the shortening will help create that indulgent, flaky crumb.
Hydrate with Warm Water
Now, gradually add in the 3/4 cup warm water, kneading gently until a soft dough forms. You want it to be smooth but not sticky — this’ll ensure that your sopaipillas puff beautifully when fried.
Let the Dough Rest
Once your dough is formed, cover it and let it rest for 30 minutes. Giving it time to relax is essential for that fluffy texture we crave!
Roll Out the Dough
After resting, roll out the dough to about 1/4 inch thick on a lightly floured surface. This thickness is just right for achieving the perfect balance of crispy and tender.
Cut Shapes
Now, use a knife or pizza cutter to cut the rolled-out dough into diamond or square shapes. No need to be perfect; part of the fun of homemade cooking is the charming imperfections!
Heat Up the Oil
Next, heat the oil in a frying pan over medium heat. You want it hot enough that when you drop a small piece of dough in, it bubbles right away!
Fry to Perfection
Once the oil is ready, fry the dough pieces until golden brown on both sides, which takes about 1-2 minutes per side. Be careful not to overcrowd the pan; this can cause uneven cooking.
Drain Well
Once golden, remove the sopaipillas with a slotted spoon and let them drain on paper towels. This allows them to stay crispy!
Serve Warm
Finally, serve them warm with a drizzle of honey or a sprinkle of powdered sugar. You want that wonderful aroma wafting through the kitchen as everyone gathers around!
HOW TO STORE SOPAIPILLAS
If you’re lucky enough to have leftovers — they store quite well! You can keep sopaipillas at room temperature for up to two days in an airtight container. For longer storage, pop them in the fridge for about 3-4 days. If you want to freeze them, they can last up to 2-3 months; just remember to thaw them at room temperature or reheat in a toaster oven to regain that crispy goodness.
TIPS FOR SUCCESS
- Don’t rush the resting period; it’s essential for creating that perfect texture.
- Monitor your oil temperature; if it’s too hot, the outside will burn before the inside cooks.
- For an extra flavor boost, consider adding herbs or spices to the dough.
- Ensure your dough isn’t too sticky before rolling it out; add a bit more flour if needed.
- Serve immediately for the best experience — they lose their charm when allowed to sit too long.
SERVING SUGGESTIONS
- Pair with a spicy chili for a comforting meal.
- Drizzle with honey or serve alongside fruit preserves for a delicious dessert.
- Enjoy with whipped cream or ice cream for a decadent sweet treat.
- Toss in some cinnamon sugar for an extra punch of flavor.
- Serve as an appetizer with warm melted cheese or a savory dipping sauce.
These sopaipillas truly embody the essence of comfort food. I hope you find joy in making them as much as I do! Happy cooking!